Why Is My Kitchen Sink Leaking Underneath? A Comprehensive Guide to Diagnosis and Repair
A leaking kitchen sink can be a homeowner’s nightmare. That persistent drip, drip, drip isn’t just annoying; it can lead to water damage, mold growth, and wasted water, ultimately increasing your utility bills. If you’re asking, “Why is my kitchen sink leaking underneath?” you’ve come to the right place. This comprehensive guide will walk you through the common causes of kitchen sink leaks, how to diagnose the problem, and what steps you can take to fix it yourself or when to call a professional plumber. We’ll provide expert insights, based on years of experience troubleshooting plumbing issues, to help you understand the underlying problems and prevent future leaks. This guide is designed to empower you with the knowledge and confidence to tackle this common household problem effectively.
Understanding the Anatomy of Your Kitchen Sink Plumbing
Before diving into the potential causes of a leak, it’s crucial to understand the basic components of your kitchen sink plumbing. This knowledge will make it easier to identify the source of the leak and choose the appropriate solution.
* **The Sink Basin:** The actual bowl where you wash dishes. Leaks here are rare but can occur around the drain opening or where the sink meets the countertop.
* **The Drain Assembly:** This includes the strainer basket (the metal piece with holes), the drain flange (the part that connects the basket to the drainpipe), and the tailpiece (the pipe extending down from the flange).
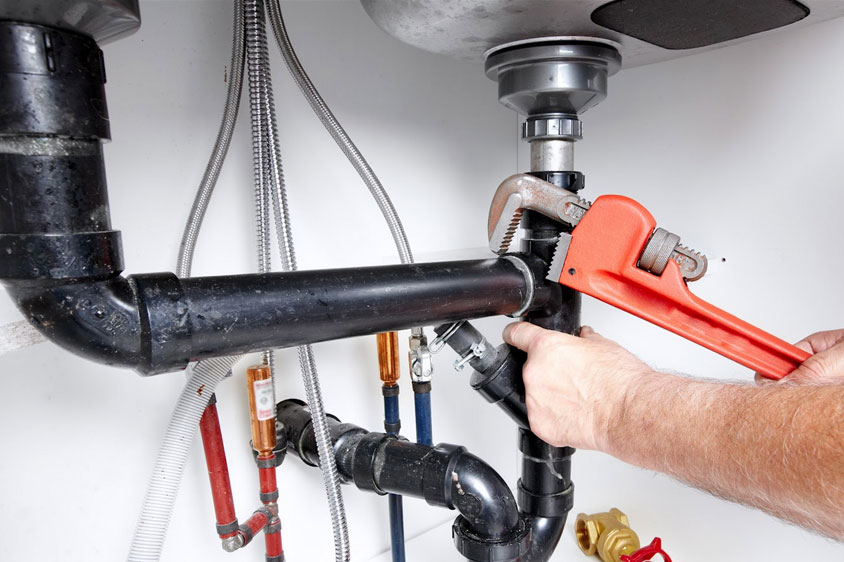
* **P-Trap:** The curved pipe under the sink, designed to trap debris and prevent sewer gases from entering your home. It’s a common source of leaks due to loose connections or corrosion.
* **Drainpipes:** The pipes that carry wastewater away from the P-trap to the main drain line.
* **Supply Lines:** Flexible or rigid pipes that connect to the faucet and provide hot and cold water. These are often made of copper, stainless steel, or PEX.
* **Shut-Off Valves:** Located on the supply lines, these valves allow you to turn off the water supply to the sink without shutting off water to the entire house. Always use these before attempting any repairs.
* **Faucet:** The fixture that dispenses water into the sink. Leaks can occur around the base of the faucet, the spout, or the handles.
Understanding these components is the first step in diagnosing why your kitchen sink is leaking underneath.
Common Causes: Why is My Kitchen Sink Leaking Underneath?
Several factors can contribute to a kitchen sink leak. Here’s a breakdown of the most common culprits:
1. Loose or Corroded Connections
This is perhaps the most frequent reason for leaks. Over time, the connections between pipes, fittings, and the sink itself can loosen due to vibrations, temperature changes, or general wear and tear. Corrosion can also weaken these connections, leading to leaks. According to our experience, this is the first place to check.
* **Solution:** Tighten any loose connections with a wrench. If corrosion is present, consider replacing the affected parts.
2. Worn-Out Washers and O-Rings
Washers and O-rings are rubber or plastic seals that prevent leaks between connections. These can dry out, crack, or become brittle over time, losing their ability to create a watertight seal.
* **Solution:** Replace worn-out washers and O-rings. These are inexpensive and readily available at most hardware stores. Make sure to match the size and type of the original seal.
3. Leaky Faucet
A dripping faucet, while seemingly minor, can indicate a more significant problem within the faucet itself. Worn-out cartridges, valve seats, or O-rings inside the faucet can cause leaks.
* **Solution:** Depending on the type of faucet, you may need to replace the cartridge, valve seat, or O-rings. Faucet repair kits are available for many models. If the faucet is old or heavily corroded, consider replacing the entire unit.
4. Corroded or Damaged Pipes
Pipes, especially those made of metal, can corrode over time, leading to pinhole leaks or weakened joints. Physical damage, such as dents or cracks, can also cause leaks.
* **Solution:** Replace corroded or damaged pipes. For minor pinhole leaks, you might be able to use a temporary patching compound, but a permanent replacement is always recommended.
5. Clogged Drain
A clogged drain can cause water to back up into the sink and put pressure on the drain connections, leading to leaks. The pressure from the blockage forces water to find the path of least resistance, often through weak points in the plumbing.
* **Solution:** Clear the clogged drain using a plunger, drain snake, or chemical drain cleaner. Be cautious when using chemical drain cleaners, as they can damage pipes if used improperly. Prevention is key; avoid pouring grease or large food particles down the drain.
6. Faulty P-Trap
The P-trap is designed to trap debris, but it can also become a source of leaks if it’s cracked, corroded, or has loose connections. Because it’s located at the lowest point under the sink, it’s susceptible to accumulating sediment and corrosion.
* **Solution:** Tighten the connections on the P-trap. If the P-trap is damaged, replace it with a new one. These are relatively inexpensive and easy to install.
7. Dishwasher Connection Issues
If you have a dishwasher connected to your kitchen sink plumbing, leaks can occur at the connection point. This could be due to a loose hose clamp, a damaged hose, or a faulty air gap (a device that prevents backflow from the dishwasher into the water supply).
* **Solution:** Check the dishwasher hose and connections for leaks. Tighten any loose clamps or replace damaged hoses. Ensure the air gap is clean and functioning properly.
8. Sink Basin Seal Failure
The seal between the sink basin and the countertop can deteriorate over time, allowing water to seep through. This is more common with older sinks or sinks that have been improperly installed.
* **Solution:** Remove the old sealant and apply a fresh bead of silicone caulk around the perimeter of the sink where it meets the countertop. Ensure the surface is clean and dry before applying the caulk.
Diagnosing the Leak: A Step-by-Step Approach
Now that you understand the potential causes, let’s walk through a systematic approach to diagnosing the source of your kitchen sink leak. This process involves careful observation and elimination.
1. **Clear the Area:** Remove everything from under the sink to give yourself a clear view of the plumbing.
2. **Dry the Area:** Use towels or paper towels to thoroughly dry all the pipes, connections, and the surrounding area. This will make it easier to spot the source of the leak.
3. **Run the Water:** Turn on the faucet and observe where the water is leaking from. Check all the connections, pipes, and the base of the faucet.
4. **Check the Drain:** Fill the sink with water and then let it drain. Watch for leaks around the drain flange, tailpiece, and P-trap.
5. **Inspect the Supply Lines:** Check the supply lines and shut-off valves for leaks. Look for signs of corrosion or damage.
6. **Test the Dishwasher Connection:** Run the dishwasher and check for leaks at the connection point to the sink plumbing.
7. **Use a Flashlight:** A flashlight can help you see into tight spaces and identify small leaks.
8. **Feel for Moisture:** If you can’t see the leak, run your hand along the pipes and connections to feel for moisture.
By following these steps, you should be able to pinpoint the source of the leak.
DIY Repairs vs. Calling a Plumber: Knowing When to Call for Help
Once you’ve identified the source of the leak, you need to decide whether you can fix it yourself or if you need to call a plumber. Here’s a general guideline:
**DIY Repairs:**
You can usually handle these repairs yourself if you’re comfortable with basic plumbing tasks and have the necessary tools:
* Tightening loose connections
* Replacing washers and O-rings
* Replacing a P-trap
* Clearing a clogged drain
* Applying fresh caulk around the sink basin
* Replacing supply lines
**When to Call a Plumber:**
It’s best to call a plumber if:
* You’re not comfortable working with plumbing.
* You can’t identify the source of the leak.
* The leak involves complex plumbing issues, such as corroded pipes or a faulty faucet.
* You suspect water damage behind walls or under floors.
* You’re dealing with a major leak that could cause significant damage.
Remember, it’s always better to err on the side of caution. A professional plumber has the expertise and tools to diagnose and repair plumbing problems quickly and efficiently, preventing further damage.
Tools You’ll Need for Kitchen Sink Repairs
Before you start any DIY repairs, make sure you have the necessary tools on hand. Here’s a list of essential tools for kitchen sink repairs:
* **Basin Wrench:** Used to loosen and tighten nuts in hard-to-reach places, such as the faucet connections.
* **Adjustable Wrench:** A versatile tool for tightening and loosening nuts and bolts.
* **Pipe Wrench:** Used for gripping and turning pipes.
* **Pliers:** For gripping and holding small parts.
* **Screwdrivers (Phillips and flathead):** For removing and installing screws.
* **Plunger:** For clearing clogged drains.
* **Drain Snake:** For removing stubborn clogs.
* **Utility Knife:** For cutting caulk and other materials.
* **Caulk Gun:** For applying silicone caulk.
* **Bucket:** To catch water.
* **Towels or Rags:** For cleaning up spills.
* **Flashlight:** For seeing into dark areas.
* **Safety Glasses:** To protect your eyes.
* **Gloves:** To protect your hands.
Having these tools readily available will make the repair process much smoother.
Preventing Future Leaks: Proactive Maintenance Tips
Preventing leaks is always better than dealing with the aftermath. Here are some proactive maintenance tips to help prevent future kitchen sink leaks:
* **Regularly Inspect:** Check under your sink regularly for signs of leaks, corrosion, or damage.
* **Tighten Connections:** Periodically tighten the connections on pipes, fittings, and the faucet.
* **Replace Worn Parts:** Replace worn-out washers, O-rings, and other parts as needed.
* **Avoid Clogs:** Avoid pouring grease, coffee grounds, or large food particles down the drain. Use a strainer to catch debris.
* **Flush with Hot Water:** Periodically flush the drain with hot water to help prevent grease buildup.
* **Use a Drain Cleaner:** Use a drain cleaner periodically to prevent clogs from forming. Choose a drain cleaner that is safe for your pipes.
* **Protect Pipes from Freezing:** In cold climates, protect your pipes from freezing by insulating them or letting the faucet drip during extremely cold weather.
* **Proper Installation:** Ensure that your sink and plumbing are properly installed by a qualified professional.
By following these maintenance tips, you can significantly reduce the risk of future kitchen sink leaks.
The Environmental Impact of Leaky Sinks
It’s easy to overlook the environmental consequences of a seemingly small leak. However, even a slow drip can waste a significant amount of water over time. According to the EPA, household leaks can waste nearly 1 trillion gallons of water annually nationwide. This not only increases your water bill but also puts a strain on local water resources. By addressing leaks promptly, you’re contributing to water conservation efforts and reducing your environmental footprint. Furthermore, leaks can lead to mold growth, which can negatively impact indoor air quality and pose health risks.
Advanced Leak Detection Techniques
While visual inspection is often sufficient for identifying obvious leaks, there are advanced techniques that can help detect hidden leaks. These techniques are often used by professional plumbers and can be particularly useful for diagnosing leaks behind walls or under floors.
* **Pressure Testing:** This involves isolating sections of the plumbing system and pressurizing them with air or water to check for leaks.
* **Acoustic Leak Detection:** This uses sensitive microphones to listen for the sound of water escaping from a pipe.
* **Infrared Thermography:** This uses infrared cameras to detect temperature differences caused by leaks.
* **Moisture Meters:** These devices measure the moisture content of building materials, helping to identify areas affected by leaks.
These advanced techniques can help pinpoint the exact location of a leak, even if it’s not visible.
Understanding Different Types of Faucets and Their Common Leak Points
Kitchen faucets come in various styles, each with its own common leak points. Understanding the type of faucet you have can help you diagnose the problem more effectively.
* **Compression Faucets:** These are the oldest type of faucet and use separate hot and cold water handles. Leaks often occur around the valve stem or the spout due to worn-out washers and O-rings.
* **Cartridge Faucets:** These have a single handle that controls both water flow and temperature. Leaks often occur around the base of the handle or the spout due to a worn-out cartridge.
* **Ball Faucets:** These also have a single handle and use a ball valve to control water flow and temperature. Leaks often occur around the base of the handle or the spout due to worn-out springs and seals.
* **Ceramic Disc Faucets:** These are the most modern type of faucet and use ceramic discs to control water flow and temperature. Leaks are less common with these faucets but can occur around the base of the handle or the spout due to damaged ceramic discs.
Knowing the type of faucet you have will help you identify the most likely cause of the leak.
Q&A: Addressing Your Kitchen Sink Leak Concerns
Here are some frequently asked questions about kitchen sink leaks, along with expert answers:
1. **Q: How much water does a leaky faucet waste per day?**
**A:** A faucet that drips once per second can waste over 3,000 gallons of water per year. A steady stream can waste significantly more.
2. **Q: Can a leaky sink cause mold?**
**A:** Yes, a leaky sink can create a damp environment that promotes mold growth, especially behind walls or under floors.
3. **Q: What’s the best way to clear a clogged drain?**
**A:** Start with a plunger. If that doesn’t work, try a drain snake. Chemical drain cleaners should be used as a last resort, following the instructions carefully.
4. **Q: How often should I replace my kitchen faucet?**
**A:** A good quality kitchen faucet can last 10-15 years or more with proper maintenance. Replace it when it becomes difficult to repair or when it’s heavily corroded.
5. **Q: What’s the difference between Teflon tape and pipe dope?**
**A:** Teflon tape is used to seal threaded connections, while pipe dope is a paste-like sealant used for the same purpose. Both help create a watertight seal.
6. **Q: Is it safe to drink water from a leaky faucet?**
**A:** Generally, yes, but if the faucet is old or corroded, it’s best to avoid drinking water that has been sitting in the faucet for a long time.
7. **Q: How can I prevent hard water stains on my kitchen sink?**
**A:** Wipe down the sink after each use with a clean, dry cloth. You can also use a hard water stain remover.
8. **Q: What are the signs of a hidden water leak?**
**A:** Signs include unexplained increases in your water bill, damp spots on walls or ceilings, and the sound of running water when no fixtures are in use.
9. **Q: Can I use vinegar to clean my kitchen sink drain?**
**A:** Yes, pouring a cup of vinegar down the drain followed by hot water can help dissolve grease and freshen the drain.
10. **Q: How do I shut off the water supply to my kitchen sink?**
**A:** Locate the shut-off valves under the sink (one for hot water and one for cold water) and turn them clockwise until they are completely closed.
Conclusion: Taking Control of Your Kitchen Sink Leak
Discovering “why is my kitchen sink leaking underneath” can feel daunting, but with the knowledge and tools provided in this guide, you can confidently diagnose and address the issue. Remember, prevention is key, so regularly inspect your plumbing and address any minor issues before they escalate into major problems. Whether you choose to tackle the repair yourself or call a professional plumber, understanding the underlying causes and potential solutions will empower you to make informed decisions and protect your home from water damage. Don’t let a leaky sink drain your resources and peace of mind. Act now to resolve the problem and enjoy a leak-free kitchen.
If you’re still unsure about the source of your leak or need professional assistance, contact a qualified plumber in your area for a thorough inspection and expert repair services. Share your experiences with kitchen sink leaks in the comments below – your insights could help other homeowners facing similar challenges.
