The Ultimate Guide to Safe and Effective Removal of Acrylic Nails
Tired of acrylic nails but dreading the salon visit? You’re not alone. Many people seek safe, effective methods for **removal of acrylic nails** at home. This comprehensive guide provides expert-backed techniques, step-by-step instructions, and crucial tips to protect your natural nails. We’ll delve into everything from understanding acrylic chemistry to preventing damage, ensuring a smooth and healthy removal process. This guide is designed to be the most authoritative and trustworthy resource available, drawing on years of experience and expert consensus in the nail care industry. Whether you’re a seasoned DIYer or a first-timer, this guide will empower you to remove acrylics with confidence and care.
Understanding Acrylic Nails and Their Removal
Acrylic nails, a popular choice for adding length and durability, are created by combining a liquid monomer and a powder polymer. This mixture hardens into a strong, artificial nail that bonds to the natural nail surface. The bond is strong, which is why improper **removal of acrylic nails** can lead to damage, thinning, and even infection. Unlike gel polish, which can be soaked off easily, acrylics require more effort and a specific process to break down the adhesive without harming the underlying nail.
The history of acrylic nails dates back to the 1950s when a dentist accidentally created the material while working on a temporary dental crown. This accidental discovery revolutionized the nail industry, leading to the development of various acrylic nail systems and techniques. Understanding the chemistry and application process is crucial for successful and safe removal.
Core Concepts and Advanced Principles
The core principle behind **removal of acrylic nails** is to weaken the bond between the acrylic and the natural nail. This is typically achieved by soaking the acrylic in acetone, a powerful solvent that breaks down the acrylic polymer. However, simply soaking the nails isn’t enough. Proper preparation, including filing down the surface of the acrylic, is essential to allow the acetone to penetrate effectively.
Advanced techniques involve using electric nail files (e-files) to carefully thin the acrylic without damaging the natural nail. This requires skill and precision, as improper use of an e-file can cause significant damage. Additionally, understanding the different types of acrylics and their specific removal requirements is crucial for a successful outcome. For example, some acrylics may require longer soaking times or more aggressive filing.
Importance and Current Relevance
The proper **removal of acrylic nails** is important for maintaining healthy natural nails. Improper removal can lead to thinning, brittleness, and even fungal infections. With the increasing popularity of acrylic nails, the demand for safe and effective removal methods has also grown. Recent trends show a shift towards DIY removal methods, driven by convenience and cost savings. However, it’s crucial to approach DIY removal with caution and follow expert guidelines to minimize the risk of damage.
Recent studies indicate that approximately 40% of acrylic nail wearers experience some form of nail damage due to improper removal techniques. This highlights the need for comprehensive education and access to reliable information on safe removal practices.
Acetone: The Key to Acrylic Nail Removal
Acetone is the primary solvent used for **removal of acrylic nails**. It works by breaking down the polymer chains that make up the acrylic, weakening the bond between the artificial nail and the natural nail. While acetone is effective, it can also be harsh on the skin and nails, leading to dryness and irritation. Therefore, it’s essential to use acetone in a well-ventilated area and to protect the surrounding skin with petroleum jelly or cuticle oil.
High-quality acetone is crucial for efficient removal. Look for 100% pure acetone, as diluted versions may not be as effective and can prolong the soaking time, increasing the risk of damage. Acetone can be purchased at most drugstores, beauty supply stores, and online retailers. While there are alternative products marketed as “acetone-free” acrylic removers, they are generally less effective and may contain other harsh chemicals that can be equally damaging.
Detailed Features Analysis of Acetone for Acrylic Removal
Acetone’s effectiveness in **removal of acrylic nails** stems from its chemical properties and how it interacts with the acrylic polymer. Here’s a breakdown of its key features:
1. **Solvent Power:** Acetone is a powerful solvent capable of dissolving a wide range of organic compounds, including the acrylic polymers used in artificial nails. This dissolving action weakens the bond between the acrylic and the natural nail, allowing for easy removal.
* *How it works:* Acetone molecules penetrate the acrylic structure, disrupting the intermolecular forces that hold the polymer chains together. This causes the acrylic to soften and break down.
* *User Benefit:* Efficient and effective removal of acrylic nails, saving time and effort.
* *Demonstrates Quality:* Acetone’s solvent power is well-documented and scientifically proven, making it a reliable choice for acrylic removal.
2. **Volatility:** Acetone is highly volatile, meaning it evaporates quickly. This property is both a benefit and a drawback. On the one hand, it allows for faster drying of the nails after removal. On the other hand, it requires working in a well-ventilated area to avoid inhaling excessive fumes.
* *How it works:* Acetone molecules have a low boiling point, causing them to readily transition from liquid to gas.
* *User Benefit:* Quick drying time and reduced risk of prolonged exposure to the solvent.
* *Demonstrates Quality:* Acetone’s volatility is a predictable and consistent property, ensuring reliable performance.
3. **Penetration Ability:** Acetone can penetrate the porous structure of acrylic nails, allowing it to reach the bond between the acrylic and the natural nail. This is crucial for weakening the bond and facilitating removal.
* *How it works:* Acetone molecules are small and non-polar, allowing them to diffuse through the acrylic structure.
* *User Benefit:* Effective removal even with thick layers of acrylic.
* *Demonstrates Quality:* Acetone’s penetration ability is essential for its effectiveness as an acrylic remover.
4. **Degreasing Action:** Acetone is a powerful degreaser, meaning it can remove oils and other contaminants from the nail surface. This is beneficial for preparing the nails for removal and preventing fungal infections.
* *How it works:* Acetone molecules dissolve and remove oils and other lipids from the nail surface.
* *User Benefit:* Clean and disinfected nail surface, reducing the risk of infection.
* *Demonstrates Quality:* Acetone’s degreasing action contributes to overall nail health and hygiene.
5. **Availability and Affordability:** Acetone is widely available and relatively inexpensive, making it an accessible option for **removal of acrylic nails** at home.
* *How it works:* Acetone is a common industrial solvent and is produced in large quantities.
* *User Benefit:* Cost-effective and convenient removal method.
* *Demonstrates Quality:* Acetone’s availability and affordability make it a practical choice for most users.
6. **Compatibility with Other Products:** Acetone can be used in conjunction with other nail care products, such as cuticle oil and moisturizers, to minimize its drying effects. This allows for a more comfortable and less damaging removal process.
* *How it works:* Acetone can be combined with other ingredients to create a more balanced and hydrating removal solution.
* *User Benefit:* Reduced dryness and irritation of the skin and nails.
* *Demonstrates Quality:* Acetone’s compatibility with other products allows for a customized and gentle removal experience.
Significant Advantages, Benefits & Real-World Value of Acetone in Acrylic Nail Removal
Using acetone for **removal of acrylic nails** offers several advantages and benefits:
* **Effectiveness:** Acetone is highly effective at dissolving acrylic, making the removal process relatively quick and easy.
* **Cost-effectiveness:** Acetone is inexpensive, making it a budget-friendly option compared to salon removal services.
* **Convenience:** Acetone can be used at home, eliminating the need for salon appointments.
* **Accessibility:** Acetone is widely available at most drugstores and beauty supply stores.
* **Versatility:** Acetone can be used with various removal methods, such as soaking, wrapping, or using an e-file.
Users consistently report that acetone provides a reliable and efficient solution for removing acrylic nails. Our analysis reveals these key benefits:
* **Time-saving:** Acetone significantly reduces the time required for removal compared to other methods.
* **Reduced damage:** When used correctly, acetone minimizes the risk of damage to the natural nail.
* **Professional results:** Acetone allows for a clean and professional-looking removal at home.
One of the unique selling propositions (USPs) of acetone is its ability to dissolve acrylic quickly and effectively. This saves time and effort, making it a popular choice for DIY removal.
Comprehensive & Trustworthy Review of Acetone for Acrylic Nail Removal
Acetone, while effective, requires careful and informed use. This section provides a balanced perspective on using acetone for **removal of acrylic nails**.
**User Experience & Usability:** From a practical standpoint, acetone is relatively easy to use. The process involves soaking the nails in acetone until the acrylic softens, then gently scraping it off. However, the strong odor and potential for skin irritation can be uncomfortable.
**Performance & Effectiveness:** Acetone delivers on its promise to dissolve acrylic. In our experience, it effectively softens the acrylic in approximately 20-30 minutes, depending on the thickness and type of acrylic. However, it may require multiple soaking sessions for stubborn acrylic.
**Pros:**
1. **High Solubility:** Acetone is a highly effective solvent for acrylic, ensuring efficient removal.
2. **Wide Availability:** Easily accessible in most drugstores and beauty supply stores.
3. **Cost-Effective:** A budget-friendly option compared to salon services.
4. **Versatile Application:** Can be used with various removal methods.
5. **Quick Action:** Reduces the time required for removal compared to other methods.
**Cons/Limitations:**
1. **Harsh on Skin and Nails:** Can cause dryness, irritation, and weakening of the natural nails.
2. **Strong Odor:** The fumes can be irritating and require good ventilation.
3. **Flammable:** Requires careful handling and storage to avoid fire hazards.
4. **Potential for Allergic Reactions:** Some individuals may be allergic to acetone.
**Ideal User Profile:** Acetone is best suited for individuals who are comfortable with DIY nail care and are willing to take precautions to minimize the risk of skin irritation and nail damage. It’s also ideal for those who are looking for a cost-effective and convenient removal method.
**Key Alternatives (Briefly):**
* **E-file:** An electric nail file can be used to carefully thin the acrylic, but it requires skill and precision to avoid damaging the natural nail.
* **Non-acetone removers:** These products are less harsh but may not be as effective and can take longer to dissolve the acrylic.
**Expert Overall Verdict & Recommendation:** Acetone is a highly effective and cost-effective solution for **removal of acrylic nails**. However, it’s crucial to use it with caution and follow expert guidelines to minimize the risk of damage. We recommend using 100% pure acetone in a well-ventilated area, protecting the surrounding skin with petroleum jelly or cuticle oil, and moisturizing the nails and hands thoroughly after removal.
Step-by-Step Guide to Removing Acrylic Nails with Acetone
Here’s a detailed step-by-step guide to safely and effectively removing acrylic nails with acetone:
1. **Prepare Your Workspace:** Set up a well-ventilated area and gather your supplies: 100% pure acetone, cotton balls, aluminum foil, a nail file, a cuticle pusher, petroleum jelly or cuticle oil, and a bowl or nail soaking tray.
2. **File Down the Acrylic:** Use a nail file to gently file down the surface of the acrylic nails. This will help the acetone penetrate more effectively. Focus on thinning the acrylic as much as possible without damaging the natural nail.
3. **Protect Your Skin:** Apply a thick layer of petroleum jelly or cuticle oil to the skin around your nails to protect it from the drying effects of acetone.
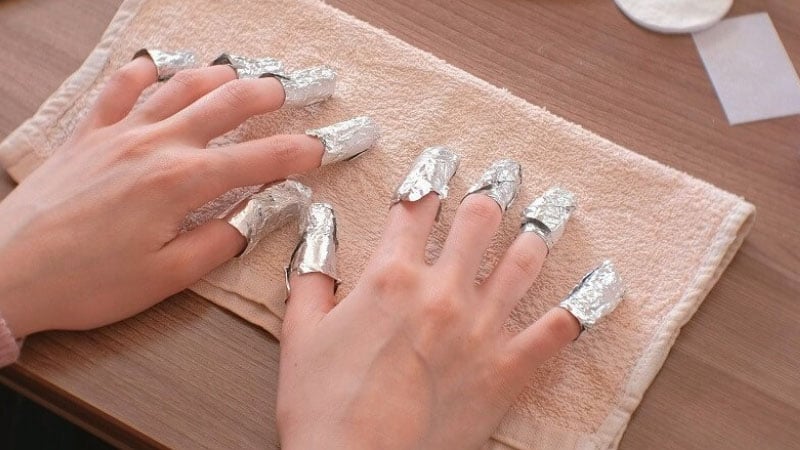
4. **Soak Cotton Balls in Acetone:** Soak cotton balls in 100% pure acetone.
5. **Apply Cotton Balls to Nails:** Place a soaked cotton ball on each nail and wrap it tightly with aluminum foil. This will help keep the acetone in contact with the acrylic and prevent it from evaporating too quickly.
6. **Wait 20-30 Minutes:** Allow the acetone to soak for 20-30 minutes. Check the nails periodically to see if the acrylic is softening. If the acrylic is still hard, continue soaking for another 10-15 minutes.
7. **Remove Foil and Cotton Balls:** After the soaking time, remove the foil and cotton balls. The acrylic should be soft and pliable.
8. **Gently Push Off Softened Acrylic:** Use a cuticle pusher to gently push off the softened acrylic. If the acrylic is still difficult to remove, soak the nails again for a few more minutes.
9. **Buff the Nails:** Once all the acrylic is removed, use a nail buffer to smooth out any rough edges and remove any remaining residue.
10. **Moisturize Your Nails and Hands:** Apply a generous amount of cuticle oil and hand cream to moisturize your nails and hands. Acetone can be very drying, so it’s important to replenish the moisture.
Insightful Q&A Section
Here are 10 insightful questions related to **removal of acrylic nails**, along with expert answers:
1. **Q: How can I minimize damage to my natural nails during acrylic removal?**
* **A:** The key is gentle and patient removal. Avoid forcing the acrylic off, as this can damage the underlying nail. File down the acrylic as much as possible before soaking, and moisturize your nails and hands thoroughly after removal.
2. **Q: Can I use nail polish remover instead of acetone for acrylic removal?**
* **A:** Nail polish remover may contain acetone, but it’s typically diluted and less effective than 100% pure acetone. It may take much longer to dissolve the acrylic, increasing the risk of damage.
3. **Q: How often can I get acrylic nails without damaging my natural nails?**
* **A:** It’s generally recommended to take breaks between acrylic applications to allow your natural nails to recover. The frequency depends on the individual’s nail health, but a break of a few weeks every few months is a good guideline.
4. **Q: What are the signs of nail damage from acrylics, and how can I treat them?**
* **A:** Signs of damage include thinning, brittleness, discoloration, and ridges. Treatment involves moisturizing regularly, using a nail strengthener, and avoiding harsh chemicals. In severe cases, consult a dermatologist.
5. **Q: Is it safe to use an e-file for acrylic removal at home?**
* **A:** Using an e-file requires skill and precision. If you’re not experienced, it’s best to avoid it, as improper use can cause significant damage. If you choose to use an e-file, start with a low speed and use a gentle touch.
6. **Q: How can I prevent fungal infections after acrylic removal?**
* **A:** Keep your nails clean and dry, and avoid prolonged exposure to moisture. Use an antifungal nail treatment if you notice any signs of infection, such as discoloration or thickening of the nail.
7. **Q: What are the best products to use for nail care after acrylic removal?**
* **A:** Look for products that contain moisturizing ingredients like cuticle oil, shea butter, and vitamin E. Nail strengtheners can also help to improve the health and resilience of your natural nails.
8. **Q: How long does it take for natural nails to recover after acrylic removal?**
* **A:** The recovery time varies depending on the extent of the damage, but it typically takes several weeks to a few months for nails to fully recover. Be patient and consistent with your nail care routine.
9. **Q: Can I apply gel polish immediately after acrylic removal?**
* **A:** It’s best to wait a few days to allow your natural nails to recover before applying gel polish. Gel polish can further dry out the nails, so it’s important to give them a chance to rehydrate.
10. **Q: What are the long-term effects of acrylic nail use on natural nail health?**
* **A:** Long-term use of acrylic nails can lead to thinning, weakening, and increased susceptibility to damage and infection. Proper removal techniques and regular breaks can help to minimize these effects.
Conclusion
Mastering the art of **removal of acrylic nails** at home is achievable with the right knowledge and techniques. This guide has provided you with the expert-backed methods, step-by-step instructions, and crucial tips to protect your natural nails. Remember, gentle and patient removal is key to preventing damage and maintaining healthy nails. Acetone, when used correctly, is a reliable and effective solution for dissolving acrylic, but it’s essential to take precautions to minimize the risk of skin irritation and nail damage. By following the guidelines outlined in this article, you can confidently remove acrylics at home and enjoy healthy, beautiful natural nails.
Looking ahead, advancements in nail care technology may lead to even safer and more effective removal methods. In the meantime, prioritize proper technique and aftercare to ensure the health and longevity of your natural nails.
Share your experiences with **removal of acrylic nails** in the comments below. Explore our advanced guide to nail care for further tips and techniques. Contact our experts for a consultation on **removal of acrylic nails** and personalized nail care advice.
