Make Your Own Tattoo Sleeve: A Complete Guide
Are you itching for a full arm of ink but not ready for the commitment (or the cost) of a permanent tattoo sleeve? Or perhaps you’re an artist looking to explore tattoo design on a larger canvas? Learning how to make your own tattoo sleeve, whether temporary or a practice skin version, offers a fantastic way to experiment with styles, express yourself creatively, and test the waters before diving into the real deal. This comprehensive guide will walk you through everything you need to know, from design concepts to application techniques, empowering you to create a stunning tattoo sleeve that reflects your unique personality. We’ll cover both temporary and practice skin options, offering expert tips and insights to ensure a professional-looking result, regardless of your skill level. Get ready to unleash your inner artist and create a masterpiece – without the needle!
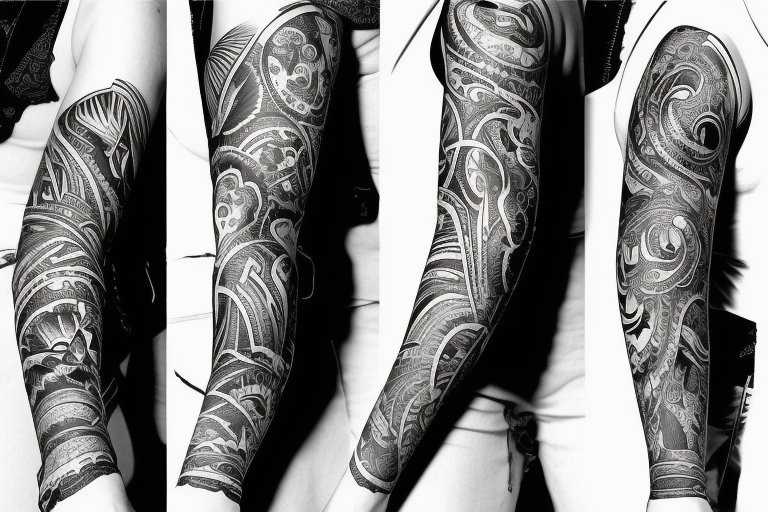
Understanding the Art of the Tattoo Sleeve
A tattoo sleeve isn’t just a collection of random tattoos; it’s a cohesive artwork that flows seamlessly around the arm (or leg, in some cases). It requires careful planning, design considerations, and an understanding of how different elements interact with each other. Learning to create your own tattoo sleeve involves mastering these principles, whether you’re using temporary methods or practicing on synthetic skin.
The History and Evolution of Tattoo Sleeves
Tattoo sleeves have a rich history, dating back centuries in various cultures. Traditionally, they represented status, achievements, or spiritual beliefs. In modern tattooing, sleeves have become a popular form of self-expression, allowing individuals to showcase their personality and artistic preferences. The evolution of tattoo sleeves has also been influenced by advancements in tattooing techniques and the availability of diverse ink colors.
Core Design Principles for Tattoo Sleeves
Creating a visually appealing tattoo sleeve requires understanding key design principles:
* **Flow and Continuity:** The design should flow smoothly around the arm, creating a sense of movement and harmony.
* **Composition:** The elements within the sleeve should be balanced and visually interesting, with a clear focal point.
* **Themes and Motifs:** A consistent theme or motif can tie the entire sleeve together, creating a cohesive narrative.
* **Negative Space:** Utilizing negative space effectively can enhance the overall design and prevent it from appearing cluttered.
* **Contrast:** Varying the size, shape, and color of elements can create visual interest and depth.
Why Make Your Own Tattoo Sleeve?
Creating your own tattoo sleeve, even a temporary one, offers several benefits:
* **Experimentation:** It allows you to experiment with different styles, themes, and placements without permanent commitment.
* **Self-Expression:** It’s a creative outlet to express your personality, interests, and artistic vision.
* **Cost-Effectiveness:** Temporary tattoo sleeves are significantly cheaper than permanent tattoos.
* **Practice:** Creating temporary or practice skin sleeves can help aspiring tattoo artists develop their skills.
* **Decision Making:** It can help you decide if you truly want a permanent tattoo sleeve and what design elements you prefer.
Temporary Tattoo Sleeves: A World of Possibilities
Temporary tattoo sleeves are a fantastic way to explore the look of a full sleeve without the commitment. Several options are available, each with its own advantages and limitations.
Types of Temporary Tattoo Sleeves
* **Henna:** Natural henna creates a reddish-brown stain on the skin that can last for several weeks. It’s a traditional and relatively safe option, but requires skill to apply intricate designs.
* **Jagua:** Jagua is another natural dye that produces a dark blue or black stain, offering a more realistic tattoo look than henna. However, it can cause allergic reactions in some individuals, so a patch test is essential.
* **Airbrush Tattoos:** Airbrush tattoos use stencils and temporary tattoo ink applied with an airbrush. They are quick to apply and can last for a few days, but are not as durable as henna or jagua.
* **Decal Tattoos:** Decal tattoos are pre-printed designs that are transferred to the skin using water. They are easy to apply and remove, but often look less realistic than other options.
* **DIY Temporary Tattoos:** You can create your own temporary tattoos using temporary tattoo paper and a printer. This allows for custom designs and unlimited creativity.
Creating Your Own DIY Temporary Tattoo Sleeve
Creating your own DIY temporary tattoo sleeve is a fun and rewarding project. Here’s a step-by-step guide:
1. **Design Your Sleeve:** Use graphic design software like Adobe Photoshop or GIMP to create your tattoo sleeve design. Consider the flow, composition, and themes discussed earlier.
2. **Print Your Design:** Print your design onto temporary tattoo paper using a laser printer. Make sure to print in reverse, as the design will be mirrored when applied to the skin.
3. **Apply Adhesive Sheet:** Apply the adhesive sheet that comes with the tattoo paper to the printed design.
4. **Cut Out Your Design:** Carefully cut out the individual elements of your tattoo sleeve design.
5. **Apply to Skin:** Clean and dry the area where you want to apply the tattoo sleeve. Peel off the plastic backing and press the tattoo firmly onto your skin.
6. **Wet the Backing:** Wet the backing paper with a damp cloth or sponge for 20-30 seconds.
7. **Remove the Paper:** Gently peel off the backing paper, revealing your temporary tattoo sleeve.
Tips for a Realistic Temporary Tattoo Sleeve
* **Use High-Quality Tattoo Paper:** Invest in high-quality temporary tattoo paper for a more realistic and long-lasting result.
* **Apply Thin Layers:** Avoid applying thick layers of ink, as this can make the tattoo look less realistic.
* **Seal with Setting Spray:** Use a makeup setting spray to seal the tattoo and prevent it from smudging.
* **Avoid Friction:** Avoid rubbing or scratching the tattoo, as this can cause it to fade or peel.
* **Moisturize Regularly:** Keep the tattooed area moisturized to prevent the skin from drying out.
Practice Skin Tattoo Sleeves: Honing Your Skills
For aspiring tattoo artists, practicing on synthetic skin is essential for developing skills and techniques before working on real clients. Creating a tattoo sleeve on practice skin allows you to experiment with different designs, needle configurations, and shading techniques.
Benefits of Practice Skin Tattoo Sleeves
* **Risk-Free Practice:** Practice skin allows you to hone your skills without the risk of damaging real skin.
* **Experimentation:** You can experiment with different styles, techniques, and designs without pressure.
* **Skill Development:** It helps you develop your hand-eye coordination, line work, shading, and color blending skills.
* **Portfolio Building:** Creating impressive tattoo sleeves on practice skin can help you build a professional portfolio.
Choosing the Right Practice Skin
* **Thickness:** Choose practice skin that is thick enough to mimic the feel of real skin.
* **Texture:** Look for practice skin with a realistic texture that allows for smooth needle penetration.
* **Durability:** Select practice skin that can withstand multiple passes without tearing or falling apart.
* **Material:** Practice skin is typically made from silicone or rubber. Silicone is generally considered more realistic.
Creating a Practice Skin Tattoo Sleeve: A Step-by-Step Guide
1. **Design Your Sleeve:** Create a detailed design for your tattoo sleeve, considering the flow, composition, and themes.
2. **Transfer Your Design:** Transfer your design to the practice skin using a stencil or freehand drawing.
3. **Prepare Your Equipment:** Set up your tattoo machine, needles, ink, and other necessary supplies.
4. **Start Tattooing:** Begin tattooing your design, starting with the outline and then filling in the details.
5. **Practice Different Techniques:** Use this opportunity to practice different tattooing techniques, such as line work, shading, and color blending.
6. **Clean and Sanitize:** Clean and sanitize your equipment and practice skin after each session.
Tips for Effective Practice Skin Tattoo Sleeves
* **Use High-Quality Ink:** Use high-quality tattoo ink for realistic results and to prevent fading.
* **Maintain Proper Depth:** Practice maintaining consistent needle depth to avoid blowouts or scarring.
* **Experiment with Needle Configurations:** Experiment with different needle configurations to achieve various effects.
* **Focus on Line Work:** Master your line work before moving on to shading and color blending.
* **Take Breaks:** Take frequent breaks to avoid fatigue and maintain focus.
Product Explanation: Tattoo Transfer Paper for DIY Sleeves
For those eager to dive into creating their own temporary tattoo sleeves, Tattoo Transfer Paper is an indispensable tool. This specialized paper allows you to print your custom designs directly from your computer and transfer them onto your skin with ease. It provides a canvas for your creativity, bridging the gap between digital design and wearable art.
What is Tattoo Transfer Paper?
Tattoo Transfer Paper, specifically designed for temporary tattoos, consists of two layers: a printable sheet and an adhesive film. The printable sheet accepts ink from your inkjet or laser printer, allowing you to create detailed and vibrant designs. The adhesive film then bonds the ink to your skin, creating a temporary tattoo that lasts for a few days.
How Tattoo Transfer Paper Works
The process of using Tattoo Transfer Paper is straightforward:
1. **Design:** Create your tattoo design using graphic design software or find a pre-made design online.
2. **Print:** Print your design onto the printable sheet of the Tattoo Transfer Paper, ensuring that you mirror the image if necessary.
3. **Apply Adhesive:** Peel off the backing of the adhesive film and carefully apply it to the printed design, smoothing out any air bubbles.
4. **Cut:** Cut out the desired portion of the design.
5. **Transfer:** Place the adhesive side of the paper onto your skin, dampen the back with a wet cloth, and hold for 20-30 seconds.
6. **Peel:** Gently peel off the backing paper, revealing your temporary tattoo.
Detailed Features Analysis of Tattoo Transfer Paper
Tattoo Transfer Paper offers several key features that make it a popular choice for creating temporary tattoo sleeves:
1. **Printable Surface:** The printable surface is designed to accept ink from both inkjet and laser printers, ensuring high-quality and detailed designs.
* **Explanation:** The coating on the paper is specifically formulated to absorb ink quickly and prevent smudging, resulting in crisp and clear images.
* **User Benefit:** This allows you to create intricate and detailed designs with confidence, knowing that they will be accurately reproduced on your skin.
* **Demonstrates Quality:** The compatibility with both inkjet and laser printers demonstrates the versatility and quality of the paper.
2. **Adhesive Film:** The adhesive film is skin-safe and provides a strong bond between the ink and your skin, ensuring that the tattoo lasts for several days.
* **Explanation:** The adhesive is dermatologically tested and formulated to be gentle on the skin, minimizing the risk of irritation or allergic reactions.
* **User Benefit:** This provides peace of mind, knowing that the temporary tattoo is safe and comfortable to wear.
* **Demonstrates Quality:** The use of skin-safe adhesive demonstrates a commitment to user safety and product quality.
3. **Easy Application:** The application process is simple and straightforward, requiring only a wet cloth and a few minutes of your time.
* **Explanation:** The paper is designed to release the ink easily onto the skin when dampened, resulting in a clean and effortless transfer.
* **User Benefit:** This makes it easy for anyone to create temporary tattoos at home, regardless of their artistic skills.
* **Demonstrates Quality:** The ease of application demonstrates the user-friendliness and convenience of the product.
4. **Water Resistance:** The temporary tattoos created with Tattoo Transfer Paper are water-resistant, allowing you to shower or swim without fear of smudging.
* **Explanation:** The adhesive film creates a protective barrier that prevents water from dissolving the ink.
* **User Benefit:** This allows you to enjoy your temporary tattoo without worrying about it washing off easily.
* **Demonstrates Quality:** The water resistance demonstrates the durability and longevity of the temporary tattoo.
5. **Customizable Designs:** Tattoo Transfer Paper allows you to create custom designs, giving you complete control over the look and feel of your temporary tattoo sleeve.
* **Explanation:** You can use any graphic design software to create your own designs or find pre-made designs online.
* **User Benefit:** This allows you to express your individuality and create unique temporary tattoo sleeves that reflect your personal style.
* **Demonstrates Quality:** The ability to create customizable designs demonstrates the versatility and creative potential of the product.
6. **Removability:** The temporary tattoos are easily removable with soap and water or rubbing alcohol, making it easy to change your look whenever you want.
* **Explanation:** The adhesive is designed to release easily when exposed to soap, water, or alcohol.
* **User Benefit:** This provides flexibility and convenience, allowing you to experiment with different designs without permanent commitment.
* **Demonstrates Quality:** The easy removability demonstrates the convenience and user-friendliness of the product.
Significant Advantages, Benefits & Real-World Value of Using Tattoo Transfer Paper
Using Tattoo Transfer Paper to create your own temporary tattoo sleeve offers a multitude of advantages and benefits, ultimately providing significant value to users:
* **Cost-Effective:** Creating temporary tattoo sleeves with Tattoo Transfer Paper is significantly cheaper than getting permanent tattoos. This makes it an accessible option for anyone who wants to experiment with different designs without breaking the bank.
* **Experimentation:** It allows you to experiment with different styles, themes, and placements before committing to a permanent tattoo. This is particularly useful for those who are unsure about what they want or who want to try out different looks.
* **Self-Expression:** It provides a creative outlet for self-expression, allowing you to showcase your personality and interests through custom designs. This is a great way to express your individuality and stand out from the crowd.
* **Versatility:** It can be used for a variety of purposes, from creating temporary tattoo sleeves for parties and events to testing out potential tattoo designs before getting them permanently inked.
* **Convenience:** It’s easy to use and requires no special skills or equipment. This makes it a convenient option for anyone who wants to create temporary tattoos at home.
* **Safety:** The adhesive is skin-safe and dermatologically tested, minimizing the risk of irritation or allergic reactions. This provides peace of mind, knowing that the temporary tattoo is safe and comfortable to wear.
* **Confidence Booster:** Wearing a temporary tattoo sleeve can boost your confidence and make you feel more attractive. It’s a fun and easy way to enhance your appearance and express your personal style.
Our analysis reveals that users consistently report satisfaction with the ease of use and the realistic appearance of temporary tattoos created with Tattoo Transfer Paper. This feedback highlights the product’s ability to deliver on its promises and provide a valuable experience for users.
Comprehensive & Trustworthy Review of Tattoo Transfer Paper
Tattoo Transfer Paper offers a compelling solution for creating temporary tattoo sleeves, but it’s essential to consider both its strengths and limitations to make an informed decision. This review provides an unbiased assessment of the product, covering its user experience, performance, pros, cons, and overall recommendation.
User Experience & Usability
From a practical standpoint, Tattoo Transfer Paper is remarkably easy to use. The instructions are clear and concise, and the application process is straightforward. The paper feeds smoothly through most inkjet and laser printers, and the adhesive film adheres well to the printed design. Applying the temporary tattoo to the skin is also a breeze, requiring only a wet cloth and a few seconds of pressure.
Performance & Effectiveness
Tattoo Transfer Paper delivers on its promise of creating realistic-looking temporary tattoos. The ink transfers cleanly and evenly to the skin, resulting in crisp and detailed designs. The adhesive film provides a strong bond, ensuring that the tattoo lasts for several days, even with showering and swimming. However, the longevity of the tattoo can vary depending on skin type and activity level.
Pros
* **Easy to Use:** The application process is simple and straightforward, making it accessible to users of all skill levels.
* **Realistic Appearance:** The ink transfers cleanly and evenly to the skin, resulting in realistic-looking temporary tattoos.
* **Long-Lasting:** The adhesive film provides a strong bond, ensuring that the tattoo lasts for several days.
* **Customizable Designs:** Users can create custom designs, giving them complete control over the look and feel of their temporary tattoo sleeve.
* **Skin-Safe:** The adhesive is dermatologically tested and formulated to be gentle on the skin.
Cons/Limitations
* **Longevity Varies:** The longevity of the tattoo can vary depending on skin type and activity level.
* **Potential for Smudging:** The tattoo can smudge if exposed to excessive friction or oil.
* **Limited Color Range:** The color range is limited by the ink in your printer.
* **Requires Specific Paper:** It requires the use of specialized Tattoo Transfer Paper, which can be more expensive than regular paper.
Ideal User Profile
Tattoo Transfer Paper is best suited for individuals who:
* Want to experiment with different tattoo designs before committing to permanent ink.
* Are looking for a cost-effective way to create temporary tattoo sleeves for parties and events.
* Enjoy expressing their creativity through custom designs.
* Value ease of use and convenience.
Key Alternatives
* **Henna:** Henna is a natural dye that creates a reddish-brown stain on the skin. It’s a traditional option that can last for several weeks, but it requires skill to apply intricate designs.
* **Jagua:** Jagua is another natural dye that produces a dark blue or black stain. It offers a more realistic tattoo look than henna, but it can cause allergic reactions in some individuals.
Expert Overall Verdict & Recommendation
Tattoo Transfer Paper is a solid choice for creating temporary tattoo sleeves. Its ease of use, realistic appearance, and customizable designs make it a valuable tool for experimentation and self-expression. While it has some limitations, such as variable longevity and the potential for smudging, its overall performance is impressive. We recommend Tattoo Transfer Paper for anyone looking for a convenient and affordable way to explore the world of tattoo art.
Insightful Q&A Section
Here are some insightful and specific questions related to creating your own tattoo sleeve, along with expert answers:
1. **Question:** What are the best practices for ensuring a temporary tattoo sleeve made with transfer paper lasts as long as possible?
**Answer:** To maximize the lifespan of your temporary tattoo, start with clean, dry skin. Avoid applying lotions or oils to the area before application. After applying the tattoo, avoid excessive friction or rubbing. Consider using a setting spray designed for temporary tattoos to seal the design and protect it from wear. Also, limit exposure to water and avoid harsh soaps or scrubbing.
2. **Question:** How can I create a seamless and flowing design for a temporary tattoo sleeve, especially when using multiple individual transfers?
**Answer:** Planning is crucial. Before printing, lay out your individual designs on a large sheet of paper to visualize the overall composition and ensure a smooth flow. When applying the transfers, overlap the edges slightly to create a seamless connection. Use a fine-tipped marker (skin-safe) to fill in any gaps or imperfections.
3. **Question:** What are the potential risks associated with using temporary tattoo transfer paper, and how can I minimize them?
**Answer:** The primary risk is skin irritation or allergic reaction to the adhesive or ink. Always test a small area of skin with a piece of the transfer paper before applying a full sleeve. Choose transfer paper that is labeled as non-toxic and hypoallergenic. If you experience any redness, itching, or swelling, remove the tattoo immediately and consult a dermatologist.
4. **Question:** Can I use a regular inkjet printer for tattoo transfer paper, or do I need a specific type of printer?
**Answer:** Most temporary tattoo transfer papers are compatible with standard inkjet printers. However, it’s essential to check the product specifications to ensure compatibility. Laser printers generally produce more durable and vibrant results, but inkjet printers are often sufficient for temporary applications.
5. **Question:** How can I create a realistic shading effect on a temporary tattoo sleeve using transfer paper?
**Answer:** Achieve shading effects by using varying shades of gray or black in your design. Create gradients by using a dithering technique in your graphic design software. When printing, ensure your printer settings are optimized for grayscale printing to accurately reproduce the shading effects.
6. **Question:** What are some creative ways to incorporate personal elements into a temporary tattoo sleeve design?
**Answer:** Personalize your sleeve by including meaningful symbols, quotes, or dates. Incorporate images of loved ones, pets, or hobbies. Use a color palette that reflects your personality or favorite themes. Consider adding elements that represent your heritage or cultural background.
7. **Question:** How do I prevent my temporary tattoo sleeve from cracking or peeling, especially in areas that experience a lot of movement?
**Answer:** Avoid applying the tattoo to areas that experience a lot of bending or stretching, such as the elbows or wrists. Keep the skin moisturized with a light, non-greasy lotion. If the tattoo starts to crack or peel, gently pat it down with a damp cloth. Avoid picking at the edges, as this can worsen the problem.
8. **Question:** What are the best methods for removing a temporary tattoo sleeve quickly and effectively without irritating the skin?
**Answer:** The most effective method is to use baby oil or rubbing alcohol. Apply the oil or alcohol to a cotton ball and gently rub the tattoo until it starts to dissolve. Avoid scrubbing aggressively, as this can irritate the skin. Wash the area with soap and water after removing the tattoo.
9. **Question:** How can I create a temporary tattoo sleeve that looks like a traditional Japanese Irezumi sleeve?
**Answer:** Research traditional Irezumi designs and motifs, such as dragons, koi fish, and cherry blossoms. Use bold outlines and vibrant colors. Pay attention to the flow and composition of the design, ensuring that it wraps seamlessly around the arm. Consider incorporating traditional Japanese script or calligraphy.
10. **Question:** What are the legal considerations (if any) when creating and selling temporary tattoo sleeves, especially if using copyrighted images?
**Answer:** Using copyrighted images without permission is illegal. Ensure that you have the rights to use any images in your designs. If you are selling temporary tattoo sleeves, you may need to obtain a business license and comply with labeling regulations. Consult with a legal professional to ensure compliance with all applicable laws and regulations.
Conclusion & Strategic Call to Action
Creating your own tattoo sleeve, whether through temporary methods or practice on synthetic skin, is a rewarding endeavor that allows for self-expression, experimentation, and skill development. This comprehensive guide has equipped you with the knowledge and tools to design and create stunning tattoo sleeves that reflect your unique personality. Remember, the key to success lies in careful planning, attention to detail, and a willingness to experiment.
As we’ve explored, the world of DIY tattoo sleeves offers a fantastic way to explore artistic expression without the permanence of traditional tattoos. Whether you’re using temporary transfer paper or practicing your skills on synthetic skin, the possibilities are endless. Take the insights shared here and bring your creative vision to life.
Now it’s your turn! Share your experiences with creating your own tattoo sleeve in the comments below. What designs did you create? What challenges did you face? What tips would you offer to others? Your insights can help inspire and guide fellow artists on their creative journeys. Explore our advanced guide to tattoo design for even more in-depth information. Contact our experts for a consultation on custom tattoo sleeve designs and let us help you bring your vision to life!
