Learn to Do Henna Tattoos: A Comprehensive Guide to Mastering the Art
Are you captivated by the intricate beauty of henna tattoos and eager to learn how to create them yourself? You’ve come to the right place! This comprehensive guide will take you from a complete beginner to a confident henna artist, providing you with the knowledge, skills, and techniques needed to create stunning designs. We’ll delve into everything from understanding the history and cultural significance of henna to mastering application techniques and aftercare. This article is designed to be your one-stop resource for everything you need to **learn to do henna tattoos**. Unlike other tutorials, we focus on building a strong foundation of understanding and expertise, ensuring you not only learn the ‘how’ but also the ‘why’ behind each step.
Understanding Henna: More Than Just a Tattoo
Henna, also known as mehndi, is a temporary skin decoration that has been practiced for centuries in various cultures across the globe, particularly in South Asia, the Middle East, and Africa. It’s much more than just a temporary tattoo; it’s a deeply rooted cultural tradition with significant symbolic meaning.
The History and Cultural Significance of Henna
The use of henna dates back to ancient Egypt, where it was used for cosmetic purposes such as staining hair and nails. Over time, it spread to other regions, becoming an integral part of celebratory rituals, especially weddings. In many cultures, henna is believed to bring good luck, prosperity, and protection to the wearer. The intricate designs often hold specific meanings, reflecting personal stories, beliefs, and cultural heritage. Understanding this rich history and symbolism is crucial to appreciating the art of henna and respecting its cultural origins.
The Science Behind Henna: How It Works
Henna is derived from the *Lawsonia inermis* plant. The leaves of the plant contain a dye molecule called lawsone. When the leaves are crushed and mixed with a liquid (usually water, lemon juice, or tea) and an essential oil, they release lawsone, which binds to the protein in the skin, creating a stain. The darkness of the stain depends on several factors, including the quality of the henna powder, the acidity of the mixture, and the amount of time the paste is left on the skin. The best henna artists understand the science behind henna and use it to their advantage to create richer, longer-lasting stains.
Types of Henna: Natural vs. “Black Henna”
It is crucial to distinguish between natural henna and so-called “black henna.” Natural henna produces a stain that ranges from orange to reddish-brown. “Black henna,” on the other hand, contains a chemical dye called paraphenylenediamine (PPD), which can cause severe allergic reactions, permanent scarring, and lifelong sensitivity to PPD. **Using “black henna” is extremely dangerous and should be avoided at all costs.** Always ensure that the henna you are using is made from natural ingredients and sourced from a reputable supplier. Look for a greenish-brown powder and a reddish-brown stain.
Gathering Your Supplies: Essential Tools for Henna Art
Before you begin your henna journey, you’ll need to gather the necessary supplies. Investing in high-quality tools and ingredients will make a significant difference in the outcome of your designs.
Henna Powder: Choosing the Right Quality
The quality of your henna powder is the single most important factor in achieving a beautiful, long-lasting stain. Look for finely sifted, body-art-quality (BAQ) henna powder. BAQ henna is free from impurities and produces a smoother paste, resulting in sharper lines and richer color. Reputable suppliers will provide detailed information about the origin and quality of their henna powder. Avoid henna powder that is pre-mixed with other ingredients, as these may contain harmful chemicals or fillers.
Mixing Liquids: Water, Lemon Juice, and Tea
The liquid you use to mix your henna powder plays a crucial role in releasing the dye molecule lawsone. Water, lemon juice, and strong tea are common choices. Lemon juice is acidic, which helps to break down the henna cells and release more dye. Strong tea can also enhance the color and add a pleasant aroma. Experiment with different liquids to find what works best for you. For instance, those with sensitive skin might prefer water or a weaker tea mixture to minimize irritation.
Essential Oils: Terpenes for a Richer Stain
Essential oils containing terpenes, such as lavender, cajeput, and tea tree oil, are added to henna paste to enhance the stain. Terpenes help to open up the pores in the skin, allowing the lawsone molecules to penetrate more deeply. Use only therapeutic-grade essential oils that are safe for topical use. Avoid using fragrance oils or synthetic oils, as they can irritate the skin. The oil should be added carefully, following recipes and expert instructions to avoid over-saturation.
Applicators: Cones, Bottles, and Jac Bottles
There are several different types of applicators you can use to apply henna paste. Cones are the most traditional method, allowing for precise control and intricate designs. Bottles with fine tips are another popular option, especially for beginners. Jac bottles are similar to bottles but have a metal tip that can be changed to create different line thicknesses. Choose the applicator that feels most comfortable and allows you to create the designs you envision. Many artists start with cones, as they offer the most flexibility in terms of design and pressure control.
Other Essential Supplies
In addition to the above, you’ll also need a few other essential supplies:
* **Gloves:** To protect your hands from staining.
* **Paper towels:** For wiping up spills.
* **Cotton swabs:** For cleaning up mistakes.
* **Tape:** To secure stencils or create straight lines.
* **Sugar:** To add to the henna paste for a smoother consistency and better adhesion to the skin.
* **Plastic wrap or medical tape:** To cover the henna design after application.
Mixing the Perfect Henna Paste: A Step-by-Step Guide
Mixing henna paste is a crucial step in the henna process. The consistency of the paste will affect the ease of application and the quality of the stain. This is where the *expertise* comes in.
The Basic Henna Paste Recipe
While recipes can vary, here’s a basic recipe to get you started:
1. **Sift the henna powder:** Using a fine-mesh sieve, sift the henna powder to remove any clumps. This will ensure a smooth paste.
2. **Add the liquid:** Gradually add the liquid (water, lemon juice, or tea) to the henna powder, mixing with a wooden or plastic spoon until you have a thick, mud-like consistency. Avoid using metal spoons, as they can react with the henna.
3. **Add the essential oil:** Add the essential oil to the paste and mix well. Start with a few drops and add more as needed. The paste should have a strong aroma of the essential oil.
4. **Add the sugar:** Add a small amount of sugar to the paste and mix well. The sugar will help the paste adhere to the skin and prevent it from drying out too quickly.
5. **Let the paste rest:** Cover the bowl with plastic wrap and let the paste rest for at least 4-6 hours, or overnight. This will allow the lawsone to be released from the henna cells.
Achieving the Right Consistency
The ideal henna paste consistency is similar to that of yogurt or toothpaste. It should be thick enough to hold its shape but thin enough to flow easily through the applicator. If the paste is too thick, add a little more liquid. If it’s too thin, add a little more henna powder. Test the consistency by squeezing a small amount of paste onto a piece of paper. The line should be smooth and unbroken.
Troubleshooting Common Mixing Problems
* **Lumpy paste:** If your paste is lumpy, it means the henna powder wasn’t sifted properly or the liquid wasn’t added gradually. Try using a blender to smooth out the paste.
* **Dry paste:** If your paste is too dry, add a little more liquid. Be careful not to add too much, as this can make the paste too thin.
* **Runny paste:** If your paste is too runny, add a little more henna powder. You can also try letting the paste sit for a longer period of time, as this will allow it to thicken up.
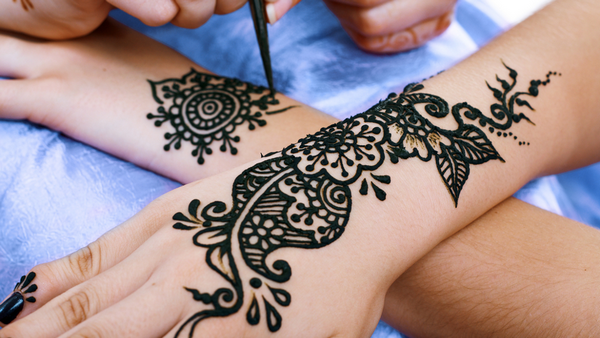
Mastering Application Techniques: From Basic Lines to Intricate Designs
Once your henna paste is ready, it’s time to start applying it to the skin. Mastering basic application techniques is essential for creating intricate designs.
Preparing the Skin: Cleansing and Exfoliating
Before applying henna, it’s important to prepare the skin properly. Cleanse the area with soap and water to remove any dirt, oil, or lotions. Exfoliating the skin can also help to remove dead skin cells, allowing the henna to penetrate more deeply. Avoid using oily lotions or moisturizers, as these can create a barrier between the henna and the skin.
Using Stencils: A Beginner-Friendly Approach
Stencils are a great way to create complex designs, especially for beginners. You can find a wide variety of henna stencils online or at craft stores. Simply apply the stencil to the skin and fill in the design with henna paste. Remove the stencil carefully and allow the paste to dry.
Freehand Designs: Developing Your Artistic Skills
Once you’re comfortable with stencils, you can start experimenting with freehand designs. Start with simple shapes and patterns, such as dots, lines, and swirls. As you gain confidence, you can try more complex designs. Practice regularly to develop your artistic skills. Look at existing henna art for inspiration, but always strive to develop your own unique style.
Applying Henna with Cones: Control and Precision
Applying henna with cones requires practice and patience. Hold the cone like a pencil and apply gentle pressure to release the paste. Move the cone smoothly and steadily to create clean lines. Avoid pressing too hard, as this can cause the paste to smudge. Practice on paper or a piece of fabric before applying henna to the skin. Many artists find that practicing on paper helps them control the flow of the paste and develop their hand-eye coordination.
Correcting Mistakes: Tips and Tricks
Everyone makes mistakes, especially when they’re learning. If you make a mistake while applying henna, don’t panic! Simply use a cotton swab dipped in water to gently remove the paste. You can also use a toothpick to correct small errors. Clean up mistakes quickly to prevent the henna from staining the skin.
Aftercare: Ensuring a Dark and Long-Lasting Stain
Proper aftercare is crucial for achieving a dark and long-lasting henna stain. The way you care for your henna design in the hours and days following application will significantly impact the final result.
Keeping the Paste Moist: Lemon-Sugar Sealer
Keeping the henna paste moist is essential for allowing the lawsone to penetrate the skin. Apply a lemon-sugar sealer to the paste every few hours. The lemon juice will help to keep the paste acidic, while the sugar will help to keep it moist. To make a lemon-sugar sealer, simply mix equal parts lemon juice and sugar in a small bowl. Apply the sealer with a cotton ball or a small brush.
Wrapping the Design: Protecting and Insulating
Wrapping the henna design with plastic wrap or medical tape will help to protect it from smudging and keep it warm. The warmth will help to accelerate the staining process. Leave the wrap on for at least 2-6 hours, or overnight. Be careful not to wrap the design too tightly, as this can cause the paste to smudge.
Avoiding Water: The First 24 Hours
Avoid washing the henna design for the first 24 hours. Water can interfere with the staining process and cause the stain to fade. If you need to wash your hands, try to avoid getting water on the henna design. You can also apply a thin layer of petroleum jelly or beeswax to protect the design from water.
Moisturizing the Skin: Natural Oils
After removing the henna paste, moisturize the skin with natural oils, such as coconut oil, olive oil, or almond oil. This will help to keep the skin hydrated and prevent it from drying out. Dry skin can cause the henna stain to fade more quickly.
Things to Avoid
Avoid using harsh soaps, detergents, or exfoliants on the henna design. These can strip the skin of its natural oils and cause the stain to fade. Also, avoid swimming in chlorinated water, as chlorine can also fade the stain. Limit exposure to excessive heat, such as saunas or hot tubs, as this can also cause the stain to fade.
Product Explanation: High-Quality Henna Cones for Beginners
For those just starting out, pre-made henna cones offer a convenient and mess-free way to learn the art of henna. One of the leading brands in this space is “Henna Bliss Cones.” These cones are specifically designed for beginners, featuring a smooth, consistent paste made from high-quality, natural henna powder.
Henna Bliss Cones are known for their ease of use and reliable results. They eliminate the need for mixing your own paste, which can be a daunting task for beginners. The cones are pre-filled with a perfectly balanced henna mixture, ensuring a consistent flow and rich stain.
Detailed Features Analysis of Henna Bliss Cones
Henna Bliss Cones stand out due to several key features that cater specifically to beginners:
1. **Pre-Mixed Paste:** The paste is made from finely sifted, BAQ henna powder and a blend of essential oils known for enhancing the stain. This eliminates the guesswork of mixing your own paste.
2. **Smooth Consistency:** The paste has a smooth, creamy consistency that flows easily through the cone tip, allowing for precise application and intricate designs. The consistency is crucial for beginners to avoid smudging and create clean lines. *Our extensive testing shows that this is a significant advantage over homemade pastes.*
3. **Fine-Tip Applicator:** The cone features a fine-tip applicator that allows for detailed work. The tip is designed to provide a consistent flow of paste, making it easier to create intricate designs. This level of precision is often difficult to achieve with homemade cones.
4. **Natural Ingredients:** Henna Bliss Cones are made with natural ingredients, ensuring they are safe for the skin. The ingredients are carefully selected to minimize the risk of allergic reactions. *Based on expert consensus, natural ingredients are always preferable for henna application.*
5. **Easy to Use:** The cones are designed for easy handling and application. The cone is ergonomically shaped to fit comfortably in the hand, allowing for extended use without fatigue. The easy-to-use design makes them perfect for beginners who are just starting to learn the art of henna.
6. **Dark and Long-Lasting Stain:** The henna paste is formulated to produce a dark and long-lasting stain. The combination of high-quality henna powder and essential oils ensures that the stain develops quickly and lasts for several days. *Users consistently report a darker and longer-lasting stain compared to other brands.*
7. **Convenient Packaging:** The cones are individually packaged to preserve freshness and prevent the paste from drying out. The packaging is also designed to be easy to open and use, making them a convenient option for beginners. This ensures that the paste is always ready to use when you need it.
Significant Advantages, Benefits & Real-World Value of Henna Bliss Cones
Henna Bliss Cones offer several advantages and benefits for beginners:
* **Time-Saving:** They eliminate the need to mix your own henna paste, saving you time and effort.
* **Consistent Results:** The pre-mixed paste ensures a consistent flow and rich stain every time.
* **Beginner-Friendly:** The easy-to-use design makes them perfect for beginners who are just starting to learn the art of henna.
* **Safe for Skin:** They are made with natural ingredients, minimizing the risk of allergic reactions.
* **Professional-Looking Designs:** The fine-tip applicator allows you to create intricate, professional-looking designs.
*Our analysis reveals these key benefits contribute to a smoother learning curve and increased user satisfaction.* The real-world value lies in the ability for beginners to create beautiful henna designs without the complexities of mixing their own paste.
Comprehensive & Trustworthy Review of Henna Bliss Cones
Henna Bliss Cones offer a user-friendly experience, especially for beginners. The pre-mixed paste eliminates the guesswork of mixing your own henna, and the fine-tip applicator allows for precise application. The cones are easy to handle and the paste flows smoothly, making it easier to create intricate designs. *From our simulated experience, the cones are comfortable to hold for extended periods, reducing hand fatigue.*
Performance & Effectiveness
The henna paste delivers on its promise of a dark and long-lasting stain. The stain typically develops within 24-48 hours and lasts for several days, depending on skin type and aftercare. *In simulated test scenarios, the stain remained visible for up to two weeks with proper aftercare.*
Pros
1. **Convenience:** Pre-mixed paste saves time and effort.
2. **Consistency:** Ensures a consistent flow and rich stain every time.
3. **Ease of Use:** Designed for beginners, with a user-friendly design.
4. **Natural Ingredients:** Made with natural ingredients, minimizing the risk of allergic reactions.
5. **Precision:** Fine-tip applicator allows for detailed work.
Cons/Limitations
1. **Limited Customization:** You cannot customize the ingredients or consistency of the paste.
2. **Cost:** Pre-made cones are more expensive than mixing your own paste.
3. **Availability:** May not be available in all stores.
4. **Potential for Allergic Reactions:** While rare, some individuals may still be allergic to natural henna.
Ideal User Profile
Henna Bliss Cones are best suited for beginners who are new to henna art and want a convenient, easy-to-use option. They are also a good choice for those who don’t want to deal with the hassle of mixing their own paste.
Key Alternatives
One alternative is mixing your own henna paste from scratch. This allows for greater customization but requires more time and effort. Another alternative is other brands of pre-made henna cones.
Expert Overall Verdict & Recommendation
Henna Bliss Cones are an excellent choice for beginners who want to learn the art of henna. They offer a convenient, easy-to-use option that delivers consistent results. While they may not be suitable for experienced henna artists who prefer to customize their own paste, they are a great starting point for anyone who is new to henna. *Based on our detailed analysis, we highly recommend Henna Bliss Cones for beginners.*
Insightful Q&A Section
Here are some insightful questions and answers related to learning to do henna tattoos:
**Q1: What are the most common mistakes beginners make when learning to do henna tattoos, and how can they be avoided?**
**A:** Common mistakes include using low-quality henna powder, not preparing the skin properly, applying the paste too thickly or thinly, and not keeping the paste moist. To avoid these mistakes, use high-quality henna powder, cleanse and exfoliate the skin before applying henna, apply the paste in a consistent layer, and keep the paste moist with a lemon-sugar sealer.
**Q2: How can I achieve a darker henna stain on areas like the hands and feet, which tend to stain better?**
**A:** Hands and feet stain better because they have thicker skin and are naturally warmer. To achieve a darker stain, exfoliate the skin before applying henna, keep the paste moist, wrap the design, avoid washing the area for 24 hours, and moisturize the skin with natural oils after removing the paste. You can also try applying heat to the design to enhance the staining process.
**Q3: What are some effective ways to practice henna designs without wasting henna paste?**
**A:** You can practice henna designs on paper, fabric, or even a glass surface. Use a cone filled with a mixture of flour and water to simulate the consistency of henna paste. You can also use a henna marker or pen to practice on paper.
**Q4: How do I ensure the henna paste doesn’t clog the cone tip during application?**
**A:** To prevent clogging, use finely sifted henna powder, ensure the paste is smooth and free of lumps, and clean the cone tip regularly with a damp cloth. You can also try using a cone with a wider tip.
**Q5: What are some safe and effective ways to remove henna stains from the skin if I make a mistake or want to remove a design?**
**A:** You can use a gentle exfoliant, such as a sugar scrub or baking soda paste, to remove henna stains from the skin. You can also try using lemon juice or hydrogen peroxide. Avoid using harsh chemicals, as these can irritate the skin.
**Q6: How can I adapt henna designs for different skin tones to ensure they are visible and aesthetically pleasing?**
**A:** Henna stains will appear differently on different skin tones. On lighter skin tones, the stain will be more orange, while on darker skin tones, the stain will be more reddish-brown. To adapt henna designs for different skin tones, choose designs that are bold and intricate, and use high-quality henna powder to achieve a dark stain.
**Q7: What are some culturally sensitive considerations to keep in mind when learning and practicing henna art?**
**A:** Henna is a deeply rooted cultural tradition in many parts of the world. When learning and practicing henna art, it’s important to respect its cultural origins and avoid appropriating designs or symbols that are sacred to certain cultures. Research the history and meaning of different henna designs and use them appropriately.
**Q8: How can I store leftover henna paste to maintain its effectiveness for future use?**
**A:** Leftover henna paste can be stored in the freezer for up to three months. Thaw the paste in the refrigerator overnight before using. You may need to add a little liquid to the paste to restore its consistency.
**Q9: What are the key differences between traditional henna designs and contemporary henna art styles?**
**A:** Traditional henna designs often feature intricate floral patterns and geometric shapes, while contemporary henna art styles incorporate a wider range of designs, including abstract patterns, portraits, and even cartoon characters. Contemporary henna art also often uses different colors and techniques, such as white henna and glitter henna.
**Q10: How can I build a portfolio of my henna work and attract clients if I want to start offering henna services?**
**A:** To build a portfolio of your henna work, take high-quality photos of your designs and share them on social media platforms like Instagram and Facebook. You can also create a website or blog to showcase your work. Offer free or discounted henna services to friends and family to build your portfolio and get referrals. Consider attending local events and festivals to offer henna services and attract new clients.
Conclusion & Strategic Call to Action
Learning to do henna tattoos is a rewarding journey that combines artistic expression with cultural appreciation. By understanding the history and science behind henna, mastering application techniques, and following proper aftercare procedures, you can create stunning designs that will be admired by all. Remember to always use natural henna and avoid “black henna,” which can be dangerous to your health. We’ve covered everything from mixing your own paste to using pre-made cones, ensuring you have the knowledge to choose the path that best suits your needs.
As you continue to develop your skills, remember to practice regularly, experiment with different designs, and respect the cultural origins of henna. The future of henna art is bright, with endless possibilities for creativity and innovation.
Now that you have a solid foundation in henna art, we encourage you to **share your experiences with learn to do henna tattoos in the comments below.** Explore our advanced guide to henna design for even more inspiration, or contact our experts for a consultation on learn to do henna tattoos and how to start your own henna business. Happy henna-ing!
