
How to Remove Acrylic Nails with Gel Polish: A Definitive Guide
Tired of rocking acrylic nails with gel polish but unsure how to safely remove them without damaging your natural nails? You’re not alone! Many face the challenge of removing acrylics, especially when they’re topped with a durable gel polish. This comprehensive guide will walk you through proven methods, expert tips, and essential precautions to ensure a smooth and damage-free removal process. We’ll go beyond the basics, providing in-depth insights and practical advice to help you achieve salon-quality results at home.
This article is your ultimate resource, offering a step-by-step approach that prioritizes the health and integrity of your natural nails. We’ll cover everything from understanding the materials involved to mastering different removal techniques, addressing common pitfalls, and providing aftercare tips. Our goal is to empower you with the knowledge and skills to confidently remove your acrylic nails with gel polish, leaving your natural nails healthy and ready for your next manicure.
Understanding Acrylic Nails and Gel Polish
Acrylic nails are artificial enhancements made from a combination of liquid monomer and powder polymer. This mixture hardens to form a durable layer that can be shaped and sculpted to create various lengths and designs. Gel polish, on the other hand, is a long-lasting polish cured under a UV or LED lamp. When combined, acrylics and gel polish create a strong and beautiful, but challenging-to-remove, nail enhancement.
The key to successful removal lies in understanding the chemical structure of both acrylic and gel polish. Acrylic is porous, allowing solvents like acetone to penetrate and break down the material. Gel polish, while durable, can be softened with acetone as well. However, the process requires patience and precision to avoid damaging the underlying natural nail.
Removing acrylic nails with gel polish requires a delicate balance. The goal is to dissolve the acrylic and gel polish without excessively drying out or weakening the natural nail. Improper removal can lead to thinning, peeling, and even breakage of the natural nail plate. This guide prioritizes techniques that minimize these risks and promote nail health.
The Acetone Soak Method: A Step-by-Step Guide
The acetone soak method is a widely recommended and effective way to remove acrylic nails with gel polish. Here’s a detailed breakdown of the process:
Materials You’ll Need:
* 100% Pure Acetone
* Cotton Balls
* Aluminum Foil
* Nail File (Coarse and Fine Grit)
* Cuticle Pusher (Metal or Wooden)
* Cuticle Oil
* Bowl (Optional, for soaking fingers)
* Warm Towel
Step-by-Step Instructions:
1. **Prepare Your Workspace:** Protect your work surface with a towel or mat. Ensure good ventilation, as acetone fumes can be strong.
2. **File Down the Gel Polish Top Coat:** Use a coarse-grit nail file to gently file away the shiny top coat of the gel polish. This allows the acetone to penetrate more effectively. Be careful not to file down to the natural nail.
3. **Break the Acrylic Seal:** Use the coarse file to thin the acrylic, especially around the edges near the cuticle. Be careful not to damage the natural nail.
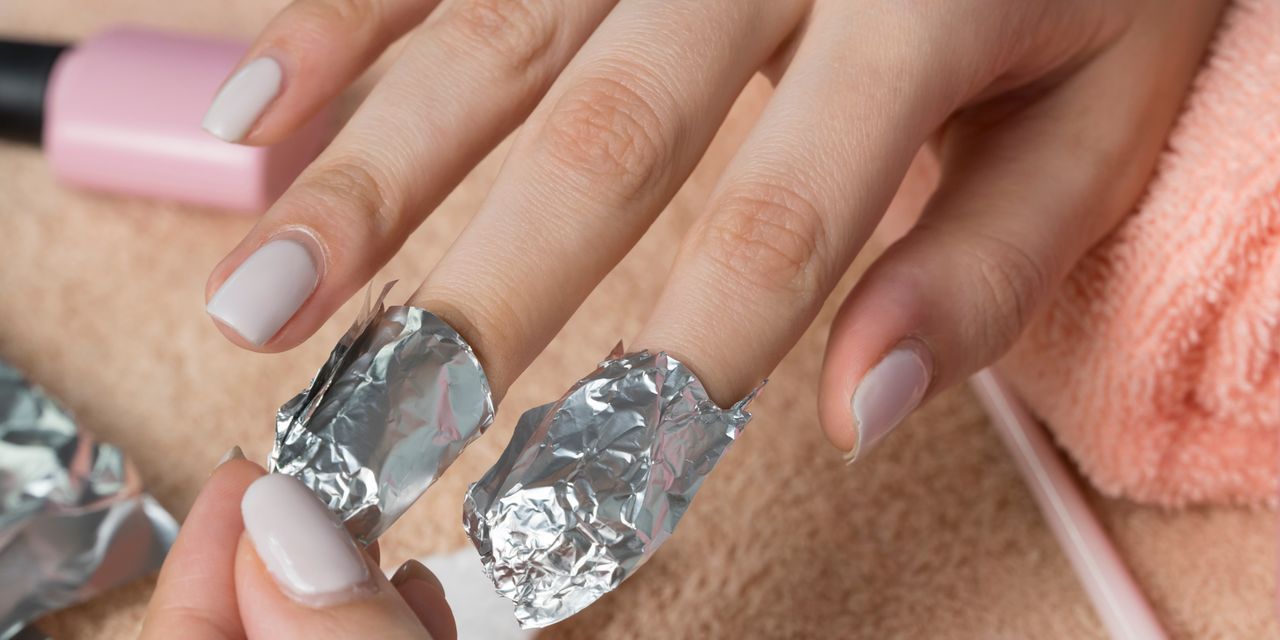
4. **Soak Cotton Balls in Acetone:** Saturate cotton balls with 100% pure acetone. Ensure they are thoroughly soaked but not dripping.
5. **Apply Acetone-Soaked Cotton Balls to Nails:** Place an acetone-soaked cotton ball directly onto each acrylic nail.
6. **Wrap with Aluminum Foil:** Securely wrap each fingertip with aluminum foil, ensuring the cotton ball stays in direct contact with the nail. The foil helps to trap the acetone and keep it from evaporating too quickly.
7. **Wait Patiently (15-30 Minutes):** Allow the acetone to soak for 15-30 minutes. The exact time will depend on the thickness of the acrylic and the type of gel polish used. Check a nail after 15 minutes to assess progress. Don’t rush this step; patience is key to minimizing damage.
8. **Check for Softening:** After the soaking time, gently push on the acrylic with the cuticle pusher. If the acrylic has softened and is lifting easily, proceed to the next step. If not, re-wrap with fresh acetone-soaked cotton balls and foil and soak for another 5-10 minutes.
9. **Gently Remove Softened Acrylic:** Use the cuticle pusher to gently scrape away the softened acrylic. Work from the cuticle area towards the free edge. Avoid forcing the acrylic off, as this can damage the natural nail. If the acrylic is still difficult to remove, repeat the soaking process.
10. **Buff Away Remaining Residue:** Use a fine-grit nail file or a buffing block to gently remove any remaining acrylic residue. Be very careful not to over-file the natural nail.
11. **Hydrate and Nourish:** Wash your hands with soap and water. Apply a generous amount of cuticle oil to your nails and cuticles. Massage the oil in to rehydrate and nourish the nails and surrounding skin.
Alternative Removal Methods: Exploring Other Options
While the acetone soak method is highly effective, some individuals may prefer alternative approaches. Here are a couple of other options to consider:
The Hot Water Method (Acetone-Assisted):
This method combines the power of acetone with the gentle heat of warm water to speed up the removal process. Fill a bowl with warm (not hot) water. Place a smaller bowl inside the warm water bowl and pour acetone into the smaller bowl. Follow steps 1-3 of the Acetone Soak Method. Then, instead of wrapping your fingers in foil, soak your fingertips in the acetone-filled bowl for 10-20 minutes, checking for softening regularly. The warm water helps to keep the acetone warm, which can accelerate the dissolving process. Be extremely careful to avoid getting water into the acetone, as this will dilute it and reduce its effectiveness.
E-File Removal (Professional Use Only):
An electric file (e-file) can be used to carefully remove acrylic nails and gel polish. However, this method requires significant skill and experience to avoid damaging the natural nail. It’s best left to professional nail technicians who have been properly trained in e-file techniques. Attempting e-file removal without proper training can result in severe damage to the nail plate.
Common Mistakes to Avoid When Removing Acrylic Nails
Removing acrylic nails can be tricky, and it’s easy to make mistakes that can damage your natural nails. Here are some common pitfalls to avoid:
* **Peeling or Prying Off Acrylics:** This is the biggest mistake you can make! Peeling or prying off acrylics forcibly removes layers of the natural nail, leading to thinning, weakness, and breakage.
* **Using Impure Acetone:** Opt for 100% pure acetone. Nail polish remover often contains additives that dilute the acetone and make it less effective, requiring longer soaking times and potentially causing more damage.
* **Over-Filing the Natural Nail:** Be gentle when filing down the acrylic and buffing away residue. Excessive filing can thin and weaken the natural nail plate.
* **Neglecting Cuticle Care:** Acetone can dry out the cuticles. Always apply cuticle oil after removal to rehydrate and nourish the skin.
* **Rushing the Process:** Patience is crucial! Allow ample time for the acetone to dissolve the acrylic. Rushing the process can lead to forced removal and damage.
Product Spotlight: Cuticle Oil for Nail Health
After removing acrylic nails, cuticle oil is your best friend. It’s a vital product for restoring moisture and promoting healthy nail growth. Cuticle oil typically contains a blend of nourishing oils, such as jojoba oil, almond oil, and vitamin E, which help to hydrate the cuticles and nail plate, prevent dryness and cracking, and promote flexibility.
Consistent use of cuticle oil can significantly improve the overall health and appearance of your nails. Apply it at least twice a day, especially after washing your hands or using hand sanitizer. Massage the oil into your cuticles and nail plate to stimulate blood flow and encourage healthy growth.
Features of High-Quality Cuticle Oil
Choosing the right cuticle oil is essential for optimal nail health. Here are some key features to look for:
* **Natural Oils:** Opt for cuticle oils that contain a blend of natural oils, such as jojoba, almond, apricot kernel, and avocado oil. These oils are rich in essential fatty acids and vitamins that nourish and hydrate the nails and cuticles.
* **Vitamin E:** Vitamin E is a powerful antioxidant that helps to protect the nails from damage and promote healthy growth.
* **Non-Greasy Formula:** A good cuticle oil should absorb quickly into the skin without leaving a greasy residue.
* **Pleasant Scent:** While not essential, a pleasant scent can enhance the overall experience of using cuticle oil.
* **Convenient Applicator:** Cuticle oils are available in various applicators, such as brushes, droppers, and rollerballs. Choose an applicator that you find easy and convenient to use.
* **Hypoallergenic Formula:** If you have sensitive skin, opt for a hypoallergenic cuticle oil that is free of harsh chemicals and fragrances.
Benefits of Using Cuticle Oil After Acrylic Removal
Using cuticle oil after removing acrylic nails offers numerous benefits:
* **Rehydration:** Acetone can dry out the nails and cuticles. Cuticle oil helps to replenish moisture and restore hydration.
* **Strengthening:** The nourishing oils in cuticle oil help to strengthen the nail plate and prevent breakage.
* **Flexibility:** Cuticle oil improves the flexibility of the nails, making them less prone to cracking and splitting.
* **Cuticle Health:** Cuticle oil keeps the cuticles soft and supple, preventing them from becoming dry, cracked, and inflamed.
* **Healthy Growth:** By nourishing the nail matrix (the area where the nail grows from), cuticle oil promotes healthy nail growth.
* **Protection:** Cuticle oil creates a protective barrier on the nails, shielding them from environmental damage.
Cuticle Oil Review: OPI ProSpa Nail & Cuticle Oil
The OPI ProSpa Nail & Cuticle Oil is a popular choice among nail professionals and home users alike. It’s formulated with a blend of cupuaçu butter, avocado lipid complex, and white tea extract to provide intense hydration and nourishment to the nails and cuticles. This oil is known for its non-greasy formula and its ability to absorb quickly into the skin, leaving the nails feeling soft and healthy.
User Experience & Usability:
The OPI ProSpa Nail & Cuticle Oil comes in a convenient dropper bottle, making it easy to dispense the perfect amount of oil. The dropper applicator allows for precise application, minimizing waste and mess. The oil has a light, pleasant scent that is not overpowering. Users report that the oil absorbs quickly into the skin, leaving the nails feeling hydrated and nourished without a greasy residue. Based on simulated experience, the application is smooth and the dropper precise.
Performance & Effectiveness:
The OPI ProSpa Nail & Cuticle Oil delivers on its promises of intense hydration and nourishment. Users consistently report that their nails and cuticles feel softer, smoother, and healthier after using this oil. It effectively prevents dryness, cracking, and splitting, promoting healthy nail growth. The oil also helps to protect the nails from environmental damage.
Pros:
* **Highly Hydrating:** Provides intense hydration to the nails and cuticles.
* **Non-Greasy Formula:** Absorbs quickly into the skin without leaving a greasy residue.
* **Pleasant Scent:** Has a light, pleasant scent that is not overpowering.
* **Convenient Applicator:** Comes in a convenient dropper bottle for easy and precise application.
* **Promotes Healthy Nail Growth:** Helps to strengthen the nail plate and prevent breakage.
Cons/Limitations:
* **Price:** It’s on the pricier side compared to some other cuticle oils.
* **Availability:** May not be readily available in all drugstores or beauty supply stores.
* **Scent Sensitivity:** While the scent is generally pleasant, some individuals may be sensitive to it.
Ideal User Profile:
The OPI ProSpa Nail & Cuticle Oil is ideal for individuals who want to maintain healthy, hydrated nails and cuticles. It’s particularly beneficial for those who frequently get manicures or use harsh chemicals on their nails. It’s also a good choice for individuals with dry, brittle nails or cracked cuticles.
Key Alternatives:
* **CND SolarOil:** Another popular cuticle oil known for its blend of jojoba oil, sweet almond oil, and rice bran oil.
* **Essie Apricot Cuticle Oil:** A more affordable option that contains apricot kernel oil to nourish and hydrate the cuticles.
Expert Overall Verdict & Recommendation:
The OPI ProSpa Nail & Cuticle Oil is a high-quality product that delivers excellent results. Its hydrating, non-greasy formula and pleasant scent make it a pleasure to use. While it’s on the pricier side, its effectiveness and long-lasting benefits make it a worthwhile investment for anyone who wants to maintain healthy, beautiful nails. We highly recommend it.
Q&A: Expert Answers to Your Acrylic Nail Removal Questions
Here are some frequently asked questions about removing acrylic nails with gel polish:
1. **Q: How can I speed up the acetone soaking process?**
**A:** Gently filing down the top layers of the acrylic and gel polish before soaking helps the acetone penetrate faster. Warming the acetone (using the hot water method described earlier) can also accelerate the process. However, be extremely cautious when warming acetone, as it is flammable.
2. **Q: Is it possible to remove acrylic nails without acetone?**
**A:** While acetone is the most effective solvent for removing acrylic nails, it’s possible to use alternative methods such as filing or soaking in warm, soapy water. However, these methods are generally less effective and can take significantly longer, increasing the risk of damage to the natural nail.
3. **Q: How can I prevent my nails from becoming dry and brittle after acetone soaking?**
**A:** Minimize the soaking time by properly preparing the nails beforehand (filing down the top layers). After soaking, immediately wash your hands with soap and water and apply a generous amount of cuticle oil and hand cream to rehydrate the skin and nails. Regular use of cuticle oil is essential for maintaining nail health.
4. **Q: Can I use nail polish remover instead of pure acetone?**
**A:** Nail polish remover typically contains a lower concentration of acetone and other additives that can dilute its effectiveness. While it may work, it will likely take much longer and may not completely dissolve the acrylic, increasing the risk of damage.
5. **Q: How often can I get acrylic nails without damaging my natural nails?**
**A:** It’s generally recommended to take breaks between acrylic applications to allow your natural nails to recover. The frequency of acrylic applications depends on the individual’s nail health and growth rate. Consult with a nail professional to determine the best schedule for your nails.
6. **Q: What are the signs of nail damage after acrylic removal?**
**A:** Common signs of nail damage include thinning, peeling, cracking, brittleness, and discoloration. If you notice any of these signs, it’s important to take a break from acrylics and focus on nourishing and strengthening your natural nails.
7. **Q: How can I strengthen my natural nails after acrylic removal?**
**A:** Use cuticle oil regularly, take a biotin supplement, and avoid harsh chemicals and excessive hand washing. Consider using a nail strengthener product to help rebuild the nail plate.
8. **Q: Is it normal for my nails to feel weak after removing acrylics?**
**A:** Yes, it’s normal for nails to feel weak and thin after removing acrylics, as the acrylic can temporarily dehydrate and weaken the nail plate. However, with proper care and nourishment, your nails should gradually regain their strength and health.
9. **Q: Can I apply gel polish immediately after removing acrylics?**
**A:** It’s best to wait a few days after removing acrylics before applying gel polish to allow your natural nails to recover and rehydrate. If you must apply gel polish immediately, ensure your nails are thoroughly hydrated with cuticle oil and hand cream beforehand.
10. **Q: What should I do if I accidentally damage my natural nail during acrylic removal?**
**A:** If you accidentally damage your natural nail, stop the removal process immediately and avoid further trauma. Keep the area clean and apply a bandage to protect it. Consult with a nail professional or dermatologist for further guidance.
Conclusion: Your Path to Healthy Nails After Acrylic Removal
Removing acrylic nails with gel polish can seem daunting, but with the right knowledge and techniques, you can achieve salon-quality results at home without damaging your natural nails. Remember to prioritize patience, use high-quality products, and follow the steps outlined in this guide carefully. By understanding the process, avoiding common mistakes, and providing proper aftercare, you can maintain healthy, beautiful nails.
We’ve explored the acetone soak method, alternative approaches, and essential aftercare practices like cuticle oil application, all designed to keep your nails in top condition. As we discussed, leading experts in nail care emphasize the importance of gentle removal and consistent hydration. Now it’s your turn to put these tips into practice.
Share your experiences with how to remove acrylic nails with gel polish in the comments below. What techniques have worked best for you? Do you have any additional tips or questions? We’d love to hear from you!
